Systems in Action
|

The following lesson was shared by InkSmith 3D Printing.
|
Lesson Overview:
In this activity, students in small groups will work together to assemble a system - in this case, a water wheel. The materials will be provided in a bag with no instructions and a timer will be placed on the board. The task for each team will be to build, take apart, and develop a set of instructions that a stranger could follow to understand the different parts and how they work together.
Evaluation Criteria:Each group will be evaluated using a Group Participation Rubric that assesses participation, attentiveness, use of time, and teamwork. The teacher will monitor the group’s progress towards achieving the expectation of creating a working model. Teachers should provide descriptive feedback, scaffold steps when necessary, and use differentiated instruction to meet the needs of their students.
|
|

By the end of this project, students will:B2.3 - use scientific inquiry/experimentation skills (see page 12) to investigate mechanical advantage in a variety of mechanisms and simple machines
B2.4 - use technological problem-solving skills (see page 16) to investigate a system B2.6 - use appropriate science and technology vocabulary, including mechanical advantage, input, output, friction, gravity, forces, and efficiency, in oral and written communication B3.1 - identify various types of systems B3.2 - identify the purpose, inputs, and outputs of various systems B3.3 - identify the various processes and components of a system |
By the end of the lesson, groups will:
|
By the end of the lesson, students should be able to:
|
Materials Required:


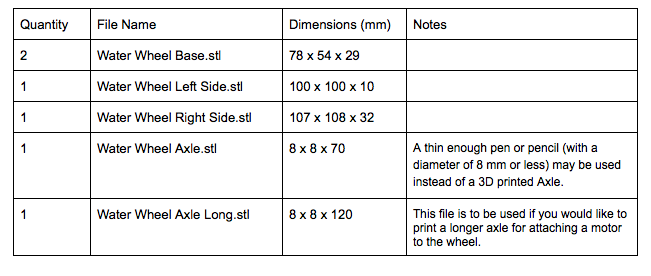
Printed Parts:
The following assembly parts (3D models) are provided in STL format. The parts are in mm. You will be able to import these files in your slicing software (e.g., Cubicreator or Simplify 3D):
|
|
| ||||||||||
Recommended Print Options:
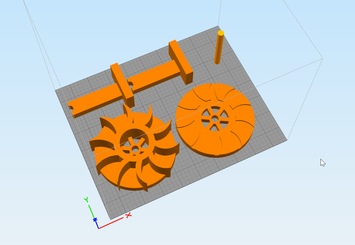
See the image for the recommended orientation of the parts on a printer bed. Ultimately, the parts should print in an orientation such that no supports are required and the flat side of the part is laying facedown on the bed.
Print Time: approximately 9:22 per wheel. You may be able to save approximately 20 minutes of print time if you choose to not print an axle and use a pencil or pen instead. Other methods of decreasing the print time include decreasing the Infill Percentage and scaling the parts down so that they are smaller.
Resources:
|
|
|
Lesson Plans
Getting Started:
This activity is unique in that explaining vocabulary should be left to the end of the lesson.
In this activity, students in small groups will work together to assemble, disassemble and write instructions to explain the process and purpose of a water wheel as it relates to generating and supplying energy. Each group will be provided with a materials kit and a timer will be placed on the board. The task will be for each group to work together to piece together the parts of the system, along the way deducing the purpose for each component.
Once the design has been constructed and then deconstructed, the group will work together to write a set of easy to follow instructions that would not only allow a new user to build the object from scratch, but also understand how each part is essential to the system’s overall function.
Steps:
- Divide students into groups of 4 or 5 and assign one group to each station.
- Provide each group with a materials kit and a flat workspace with which to build on.
- Provide initial instructions and rules and set a timer for 20 minutes on the board.
- Allow time for groups to explore and build.
- NOTE: This time is ideal for teachers to collect anecdotal evidence about student learning.
- After the time has elapsed, discuss problems and solutions faced during the activity.
- Discuss and explain the following vocabulary:
- Base
- Support
- Axle
- Pin
- Wheel
- Fin
- Belt
- Battery
- Motor
Assessment
Higher Order Questions
- How were some of the earliest societies able to store and use energy from water wheels?
- What kinds of changes have improved the original water wheel designs?
- How might changing the scale of the object change the amount of energy it can produce?
- In what ways are certain designs more efficient than others?
- How is the system impacted when a part is removed?
|
|